Tuesday, February 28, 2012

National Pancake Day


I LOVE pancakes! Growing up my daddy often made us pancakes for breakfast on Saturday mornings, topped with butter and syrup. Occasionally, Mom and I would top ours with strawberries and whipped cream! YUMMY! So, to celebrate this day (created by IHOP) we had pancakes for dinner. No fruit or whipped cream today, Matt has a strict "Don't fruit the waffles/pancakes" rule (I break this whenever possible)! =)

Yummy to my tummy!
In honor of this day, I researched pancakes and thought it was interesting to see the different names for pancakes used all over the world:

France - crepes
Germany - pfannkuchen
Netherlands - pannenkoeken
Austria - palatschinke
Greece - tiganites
Spain - frixuelos
Australia - piketes
Africa - injera
North America - hotcakes, flapjacks, (and of course) pancakes

I love corny cheesy jokes, stories, or anything...so I'll leave you with this cheesy joke:

How is a game of baseball like a pancake?


They both need a batter!<---(highlight there for answer) 

Monday, February 27, 2012

DIY Project: Dry Erase Calendar

Now that I have my Chalkboard with my To Do List, I needed a calendar to keep track of everything happening. Once again, Picky Nikki was in full force! I don't like desk calendars, paper calendars, or online calendars. I like to have a big space to write everything in and see the whole month at once, not just a weekly calendar. So, not being able to find one, I made one (with the help of the hubster)!

Remember the big barn with all the fun tools you saw before? Well, we used those tools to make a frame! We got 2x4's and planed them down, made a good edge, rabbited the other edge for the frame and pocket screwed it together! Breathe...you can just as easily go buy you a frame! Check out Hobby Lobby when they have their custom framing 50% off.

Here is the frame we made, and I decided to paint it black.
While the frame was drying, I made the calendar on the dry erase board. Daddy-O had some scrap magnetic dry erase material left over from a project that he gave to me. You can buy this at your local hardware store, Lowe's, Home Depot, etc. You will need your dry erase material, a yard stick and tape (I used art tape, found at Hobby Lobby).

Materials for Calendar.

Depending on the size of your frame and material, measure and divide by the number of columns and rows you want. I allowed for 7 rows (Month, day of week and 5 weeks) and 7 columns (# of days per week).

Once I had this complete and my frame dried, I attached this to the frame using small screws and hung the frame on the wall.

I also thought I needed something to store my dry erase markers, so I found an empty soup can, tape, scrap piece of paper and ribbon. I drilled a hole in the can, to attach it to the wall, taped the paper around the can and tied a ribbon, just for a little more pizazz!

My finished product!
I'm very pleased with how this turned out, and as you can see, that calendar is filling up fast! Time to get back to work on that To Do List from last week! =)

Friday, February 24, 2012

DIY Project: Chalkboard

In my attempt to organize my new craft room, I realized I needed a place for my lists. I love to make lists, it makes me feel organized...and let's face it, random sticky notes everywhere just didn't accomplish that "organized" look I was going for! So my remedy: a chalk board to hang on the wall so I can keep my lists in clear view and update them as needed. I'm pretty particular, picky about certain things (I do bear the nickname Picky Nikki with good reason). So I searched for a chalk board to purchase and none of them worked for me, none of them screamed, "Pick me to live in your craft room!", so I decided I would make one!

It was very easy, and the only thing it really took was time, and about $10.00 (if you don't already have any of the supplies). So, here is how I did it, so you can maybe make one also!


First of all, I have a lot of random collections at my house. I'll save something with the thought of making it useful one day. Like this cabinet door for example:

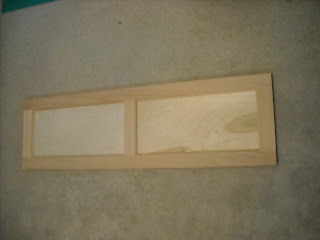
It has the perfect potential for a chalk board!
If you don't have a random cabinet door laying around your house, try checking with your local cabinet company. They usually have rejects and wrong sized doors that they will make you a deal on. I snagged this one from the company I used to work for, it was a perk that it was free...but usually they won't charge you more than $5 - $10 per door.

So I purchased some chalk board paint from Wal-Mart for just under $5.00. I read the instructions and painted the inside panels I wanted to use as the writing surface.

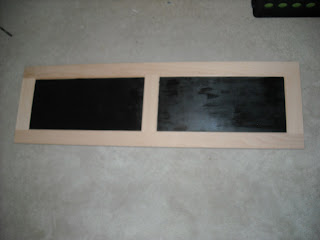
I applied 2 coats, waiting an hour for drying between coats.
 I didn't take a picture of the next step, but you can see it below. I painted the outside rails of the door white, to match the craft room. I just used acrylic paint I had in my collection. Being that it was white paint, it took about 3 coats and dry time. Once it was completely dry, I drilled holes in the back and hung it on the wall.

I decided to title my lists, they are on-going lists of: TO DO and SHOPPING LIST. For these titles I had some foam sticky letters I had gotten from the Dollar Deals and Target a few years ago. Finally got to use them!

I also needed a way to attach my chalk, because if it wasn't attached I would be constantly searching for it! I thought of ribbon, quick and easy. I have a plethora of ribbon, so I picked black and white polka dots to go along with the paint colors. I just tied it around the chalk and then used a clear push pin to attach the other end.

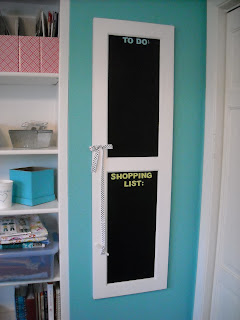
Ta Da! My new chalkboard...I'm very pleased with the turn out!

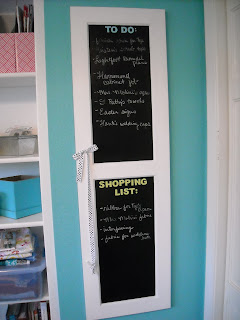
Those lists are filling up fast!
And folks, that's how the cookie crumbles! =) Now, it's time for me to go tackle a few items on that To Do List!

Thursday, February 23, 2012

German Chocolate Cake


Today is my Matt's Birthday! God has blessed me immensely with such an amazing teammate in life, and to celebrate I made his favorite, German Chocolate Cake. So in the spirit of birthdays and gift giving, I am going to share my recipe.  The cake recipe is something I've found in the past years and the icing recipe is my grandmothers (shh...don't tell her I'm sharing)! =)

First and foremost, collect all of your ingredients! (and preheat oven to 350)

Then, grease and flour 3 cake pans and set aside. (I have these awesome non-stick Gold Touch pans, so I just cut parchment paper and line the bottoms.)
Combine the chocolate and water in a small saucepan, melt, and set aside.
Combine flour, soda and salt and sift. (I always sift twice, makes it more light and fluffy.)

Cream butter and sugar in mixer, then one at a time add egg yolks.

Slowly add the melted chocolate mixture to the butter/sugar mixture. Once incorporated, alternately add flour mixture and buttermilk in two parts, starting with the flour mixture.
Fold in 1/3 of the egg whites, then quickly fold in the remaining egg whites, until there are no streaks.
 Pour into 3 cake pans and bake at 350 for about 30 minutes, or until a toothpick inserted comes out clean.

Combine ingredients in saucepan and bring to a boil.
Once it comes to a boil and thickens, remove from heat and add coconut and pecans.

Once the cakes have cooled for about 10 minutes, remove them from the pan and allow to cool completely on a cooling rack.

Layer the cake and icing, once the icing has completely cooled.

Add your top layer of cake, and then ice the top and sides.
And you have a German Chocolate Cake! YUMMY!!
 German Chocolate Cake

 1/2 cup of water
4 (1 oz) squares German sweet chocolate
1 cup of butter, softened
2 cups white sugar
4 egg yolks
1 teaspoon vanilla extract
1 cup buttermilk
2 1/2 cups cake flour
1 teaspoon baking soda
1/2 teaspoon salt
4 egg whites

Preheat oven to 350 degrees F. Grease and flour 3 - 9 inch round pans. Sift together the flour, baking soda and salt. Set aside. In a small saucepan, heat water and 4 ounces of chocolate until melted. Remove from heat and allow to cool.

In a large bowl, cream 1 cup of butter and 2 cups of sugar until light and fluffy. Beat in 4 egg yolks one at a time. Blend in the melted chocolate mixture and vanilla. Beat in the flour mixture alternately with the buttermilk, mixing just until incorporated.

In a large glass or metal mixing bowl, beat egg whites until stiff peaks form. Fold 1/3 of the whites into the batter, then quickly fold in remaining whites until no streaks remain.

Pour into 3 - 9 inch pan. Bake in the preheated oven for 30 minutes, or until a toothpick inserted into the center of the cake comes out clean. Allow to cool for 10 minutes in the pan, then turn out onto a wire rack.

German Chocolate Icing
 (I ALWAYS double this recipe for the cake, and it makes the perfect amount.)

1 cup evaporated milk
1 cup sugar
3 egg yolks
1 teaspoon vanilla extract
1/4 pound of butter
1 1/2 cups of coconut
1 cup of pecan

Mix all ingredients in a saucepan over medium heat and bring to a boil. Allow icing to thicken, but stir continuously. Remove from heat and stir in coconut and pecans. Continue to stir until cool and thick enough to spread over cake.

ENJOY!! =)


Tuesday, February 21, 2012

Pig Wrangling

So, today was just a typical Tuesday...went to Mineola with my Ma'am to visit Nanny (Matt's grandmother) and enjoyed a tasty lunch (and pick up her serger she is letting me borrow) YAY! We enjoyed the beautiful weather on the ride home and I had HIGH hopes of catching a 'lil nap once we got back. We were just coming up the last hill before the gate, my bed calling my name and what did we see? Hmm...a calf? Yes, definitely beef! I said, "Uh Oh, someone's cow got out." As we got closer I was thinking "pig" in my head but no, that's way too big to be a pig, it's a calf...and we got closer...PIG!!! Oh my! First thing I go for: IPhone, Matt's not gonna believe this sucker!

Ok, he looks a lot smaller now...he was up on the hill next to the fence and was half as high, I promise!
 He was super friendly and proceeded to come over to the car to see us; I noticed he had a tag in his ear. Oh, a show pig, I'll get out and see the tag number, call the Anderson County Extension Office and find out whose pig this is! Well, it isn't a tag number of Anderson County or Henderson County...most likely a commercial pig. We didn't want him to be bacon before his time, and someone else be injured from hitting him on the road so we thought we could put him in the pen behind the house. Liv (Matt's little sister) used to have a show pig and the pen is still there, and she also had a hog bat/slapper/whip (or whatever you want to call it). So I tried my skills at being a Pig Wrangler...and turns out I found a new Nak! (tee hee)
This was after about 1/2 a mile...she was getting ornery!!

She kept wanting to go down the hill instead of up but, persistence prevailed!
Finally in the pen...isn't she a beauty? (Probably about 300 lbs.)

That'll do pig, that'll do!
 So, needless to say, I didn't get that nap I was wanting, I got some exercise instead! Just a normal day in the country and now I can add pig wrangler to my resume! =) Still looking for the pigs owner...I'll keep you updated!

Monday, February 20, 2012

Craft Room: Part 2

Well, let me start by apologizing! I had high hopes of getting this posted on Friday, and as you can see that just didn't happen. But, here it is Monday, a fresh start to a new week and I have my (somewhat) finished craft room to share! =)
My desk/sewing area.

View from the door way.

Tall storage units.
As you can tell, there is still a lot of work to be done! I've started organizing, but I need to finish that process and get everything back into the room. I also need to decorate and I have some DIY projects to make the space more efficient. Hopefully this week I will be able to share some of these projects with you, along with some orders I have to complete. But for now, Happy Monday!

Thursday, February 16, 2012

Craft Room: Part 1

I've recently been blessed with more time on my hands...and with that time I plan to do more of the things that I love, and spend that time with people that I love! Since I have been "creating" new and fun things, my house has turned into a HUGE mess! I find thread attached to just about every pair of shoes I have, and even on my husbands fresh laundered socks. In order to help reduce this mess, my husband so generously agreed that I could turn one of our guest bedrooms into a craft room...and this was my birthday present! WOO HOO! So first, I had to come up with a plan...having a degree in Interior Design helped this process go smoothly!

This is the plan for the tall storage units with adjustable shelving.

This is the plan for my work/sewing desk.
This was a guest bedroom and I had moved the bed out before I thought to document the process, but here is the before:
Lots of craft stuff piled up!

It's also our laundry room (but the ironing board only got put up when guests were expected)...I'm terrible, I know!


So we had the room, and we had a plan we just needed to execute said plan...this is where the spending time with the people I love comes in! My husband had a week of vacation planned for the end of January, so we went to Oklahoma for a few days to see his/our brother and then we came home and our motto was "DO WORK SON!", and that's just what we did. It just so helps that my Big Daddy-O (father-in-law) has a barn/workshop with tons of cool toys tools, and the skills to use them (which he has also taught the hubster) so between the two of them and my excellent supervisor skills we got started!

The hubster and Daddy-O ripping down plywood to start the cabinets.

Drilling for adjustable shelving.


All the adjustable shelves...I got to sand these!

All the pieces cut out to make drawer boxes.


I know this seems like a lot of work, and it was, but we took breaks and had playtime too!

This is Jack in the office at the barn (he prefers this spot to most).

My better half (shooting varmints out the back door).

Nap times were a must! =)


All the building and painting and then we had a completed product ready to be installed!!

Painting all those cabinets!
Notice in these pictures, we had the room (partially) painted...all the walls that needed paint for the cabinets to be installed. My Ma'am (mother-in-law) was so gracious to help me do this so I didn't delay the guys any!

Installing the tall storage cabinets.

Posing for a photo op! (How can you not just love him?)

My desk all installed!

Just look at all that storage! =)

And now I'm sure you're just anxious to see the finished product, right? Well...stay tuned! I'm getting off this computer right now to go finish painting those walls and clean it up some so I can take that picture! You'll learn this about me, but I am far from perfect and often find myself agreeing with the quote "Why do today what you can put off until tomorrow?". But, be patient and I will get it finished, and try my best to have that AFTER photo posted for you tomorrow!